Home

Bee Rescue – Giving Back

3 Comments

I am in the midst of a trap out for a woman that can’t afford to pay the usual $400.00 to do a cut out. My wife made the connection with the woman and I was reluctant because I don’t want any part of the work and effort to do a cut out. I hemmed and hawed for a week, then asked for a photo…….good news, the location seemed to lend itself to a simple trap out. My biggest concern is Fall……once out I will need to baby the bees for them to make it through the winter.

The location- in the wall of an out of service cold box with wood clad external sides. Apparently a knot in the wood rotted out and left a very nice 1 inch diameter hole. The flat surface of the cold box simplifies the process. First build the escape cone.

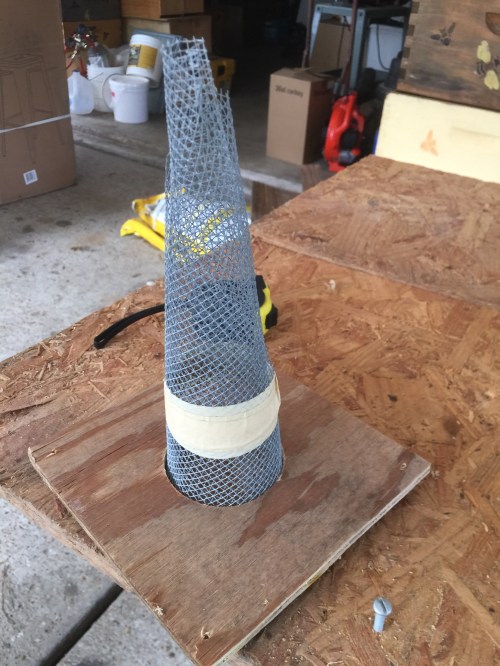
Start with 1/8 inch(#8 hardware cloth), create a cone with an exit hole a little larger than than a pencil thickness. I drilled a 2 5/8 inch hole in a thin piece of plywood, sized so 6 or 7 inches of the cone protruded through. Trimmed the fat end to create wings, covered the wings with duct tape and secured with staples.

The bees were foraging and calm when I installed the cone.

The wire cone and small escape hole is not well seen by the bees complex eyes.after escaping to forage they return and are locked out. They mill around, they smell their hive and scramble trying to find a way back in. Sometimes there are other access holes and they will find a way back in. Fortunately, I got lucky….just a single entry hole.

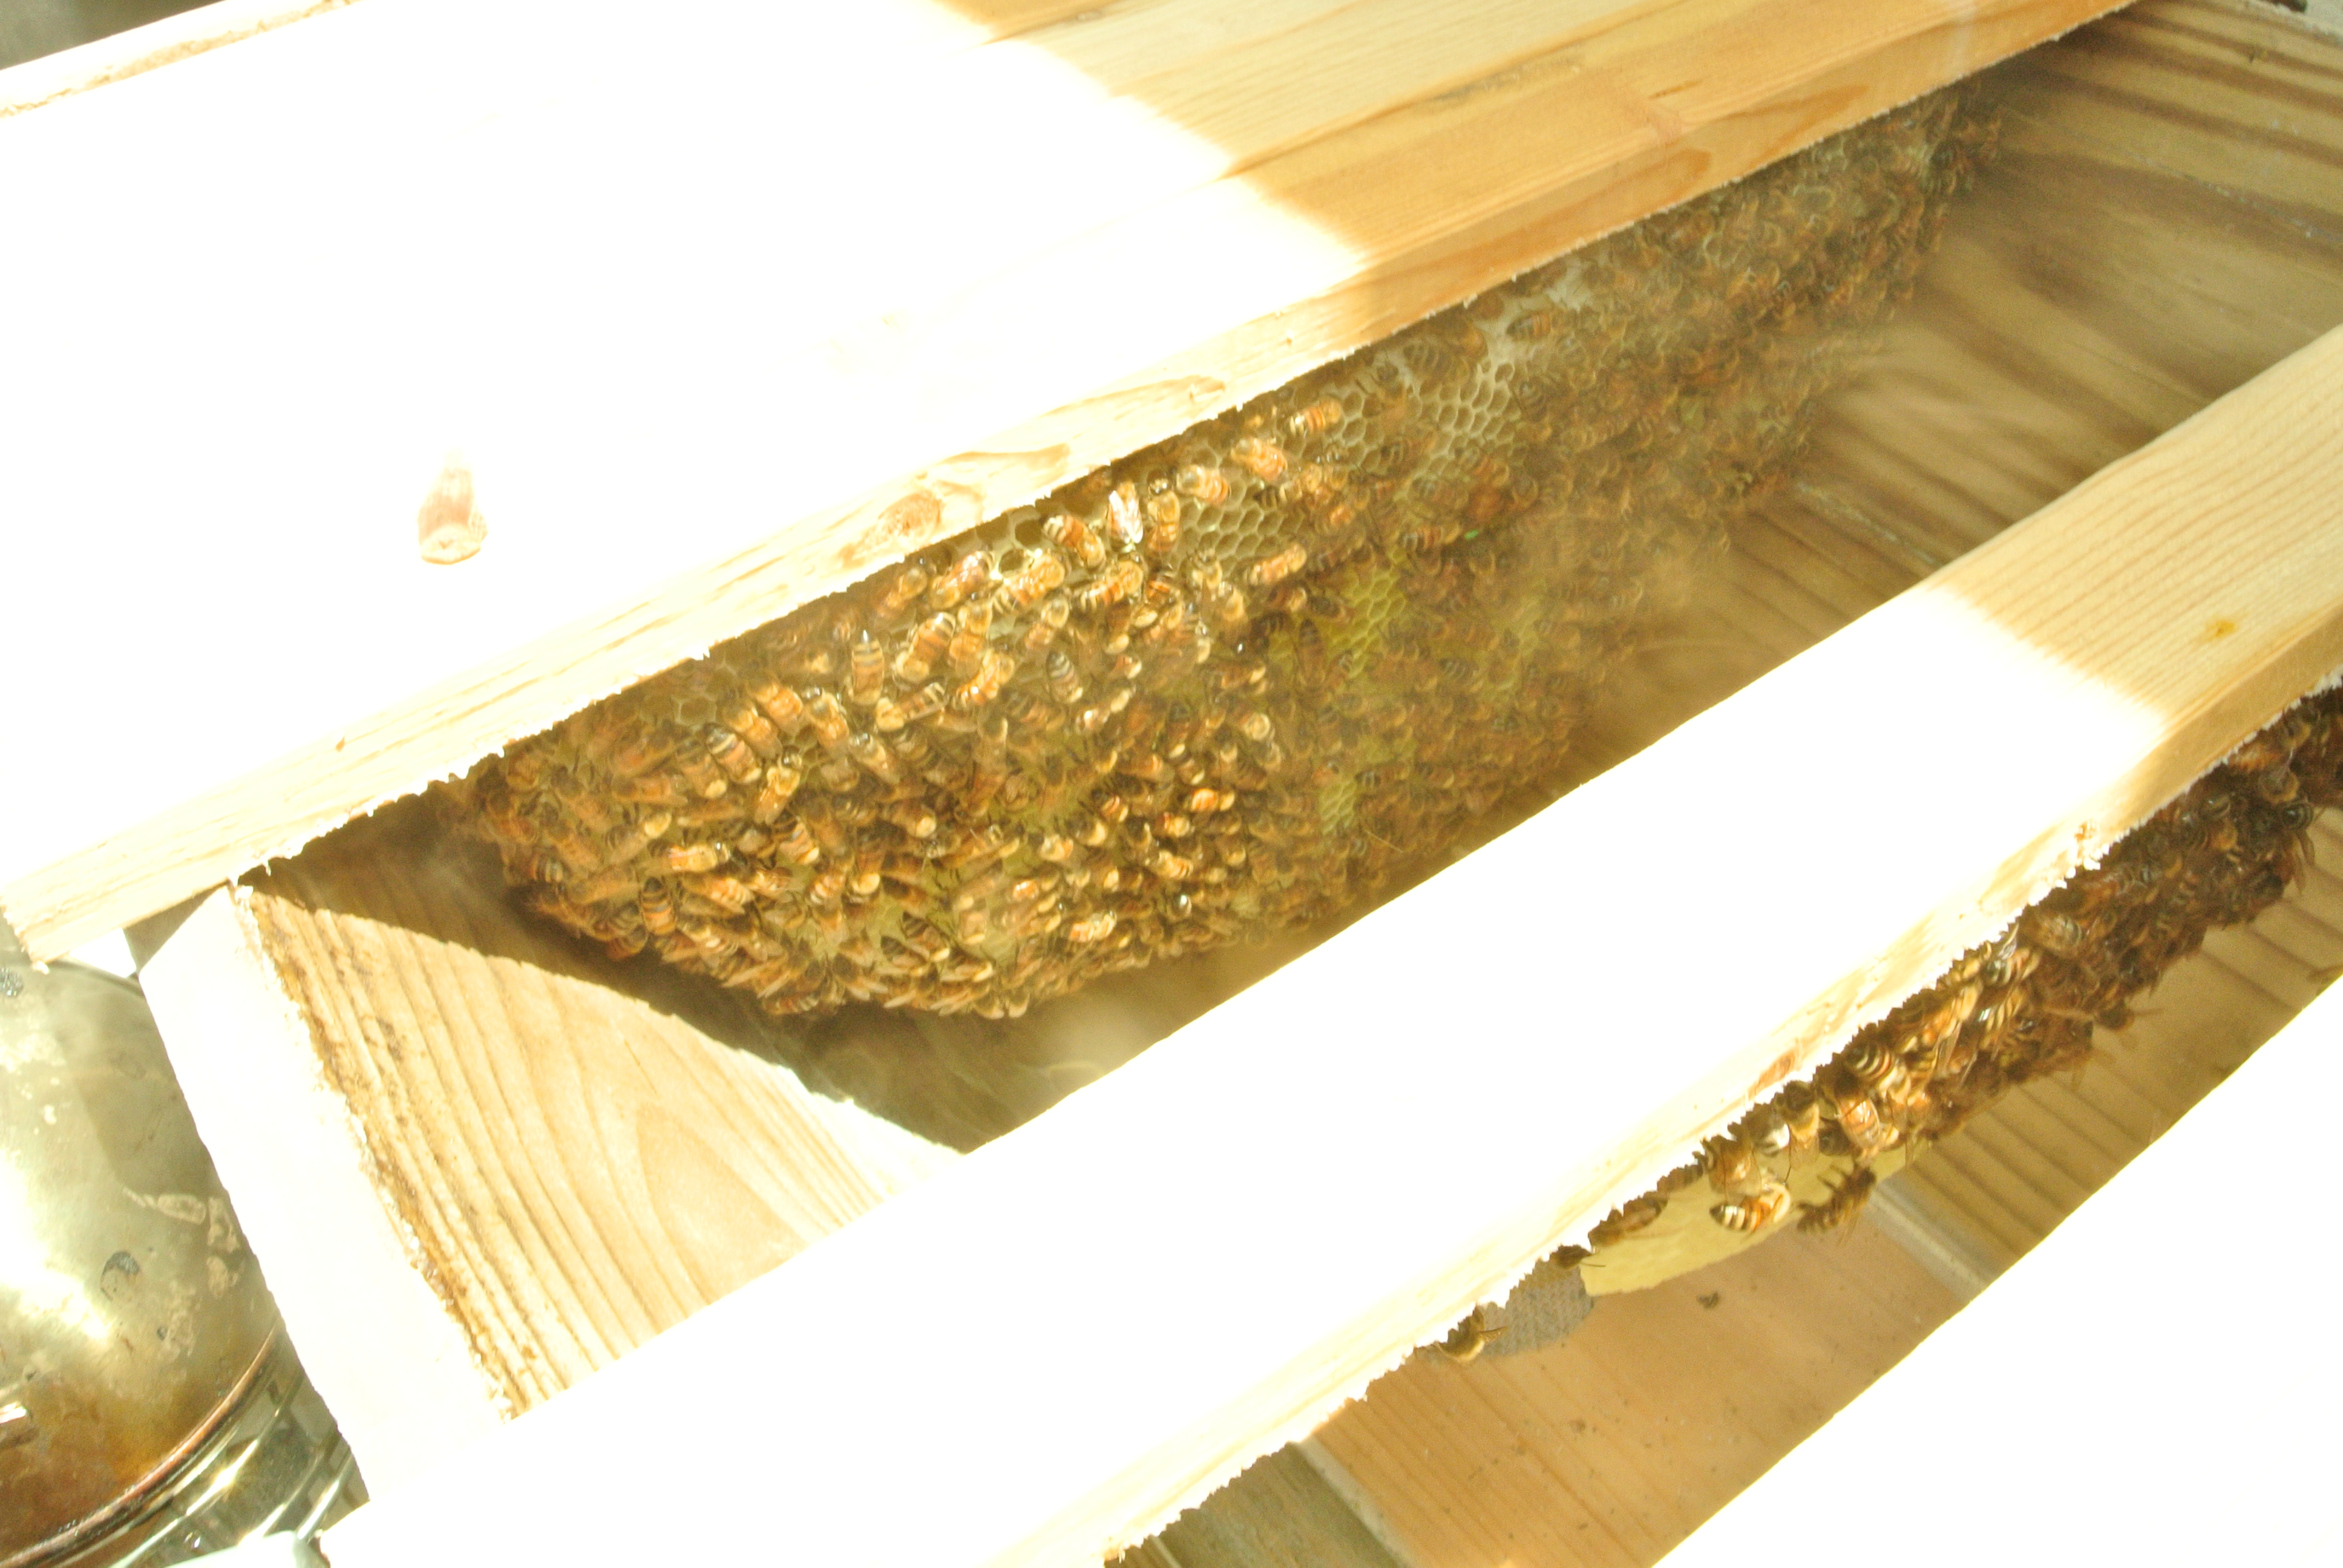
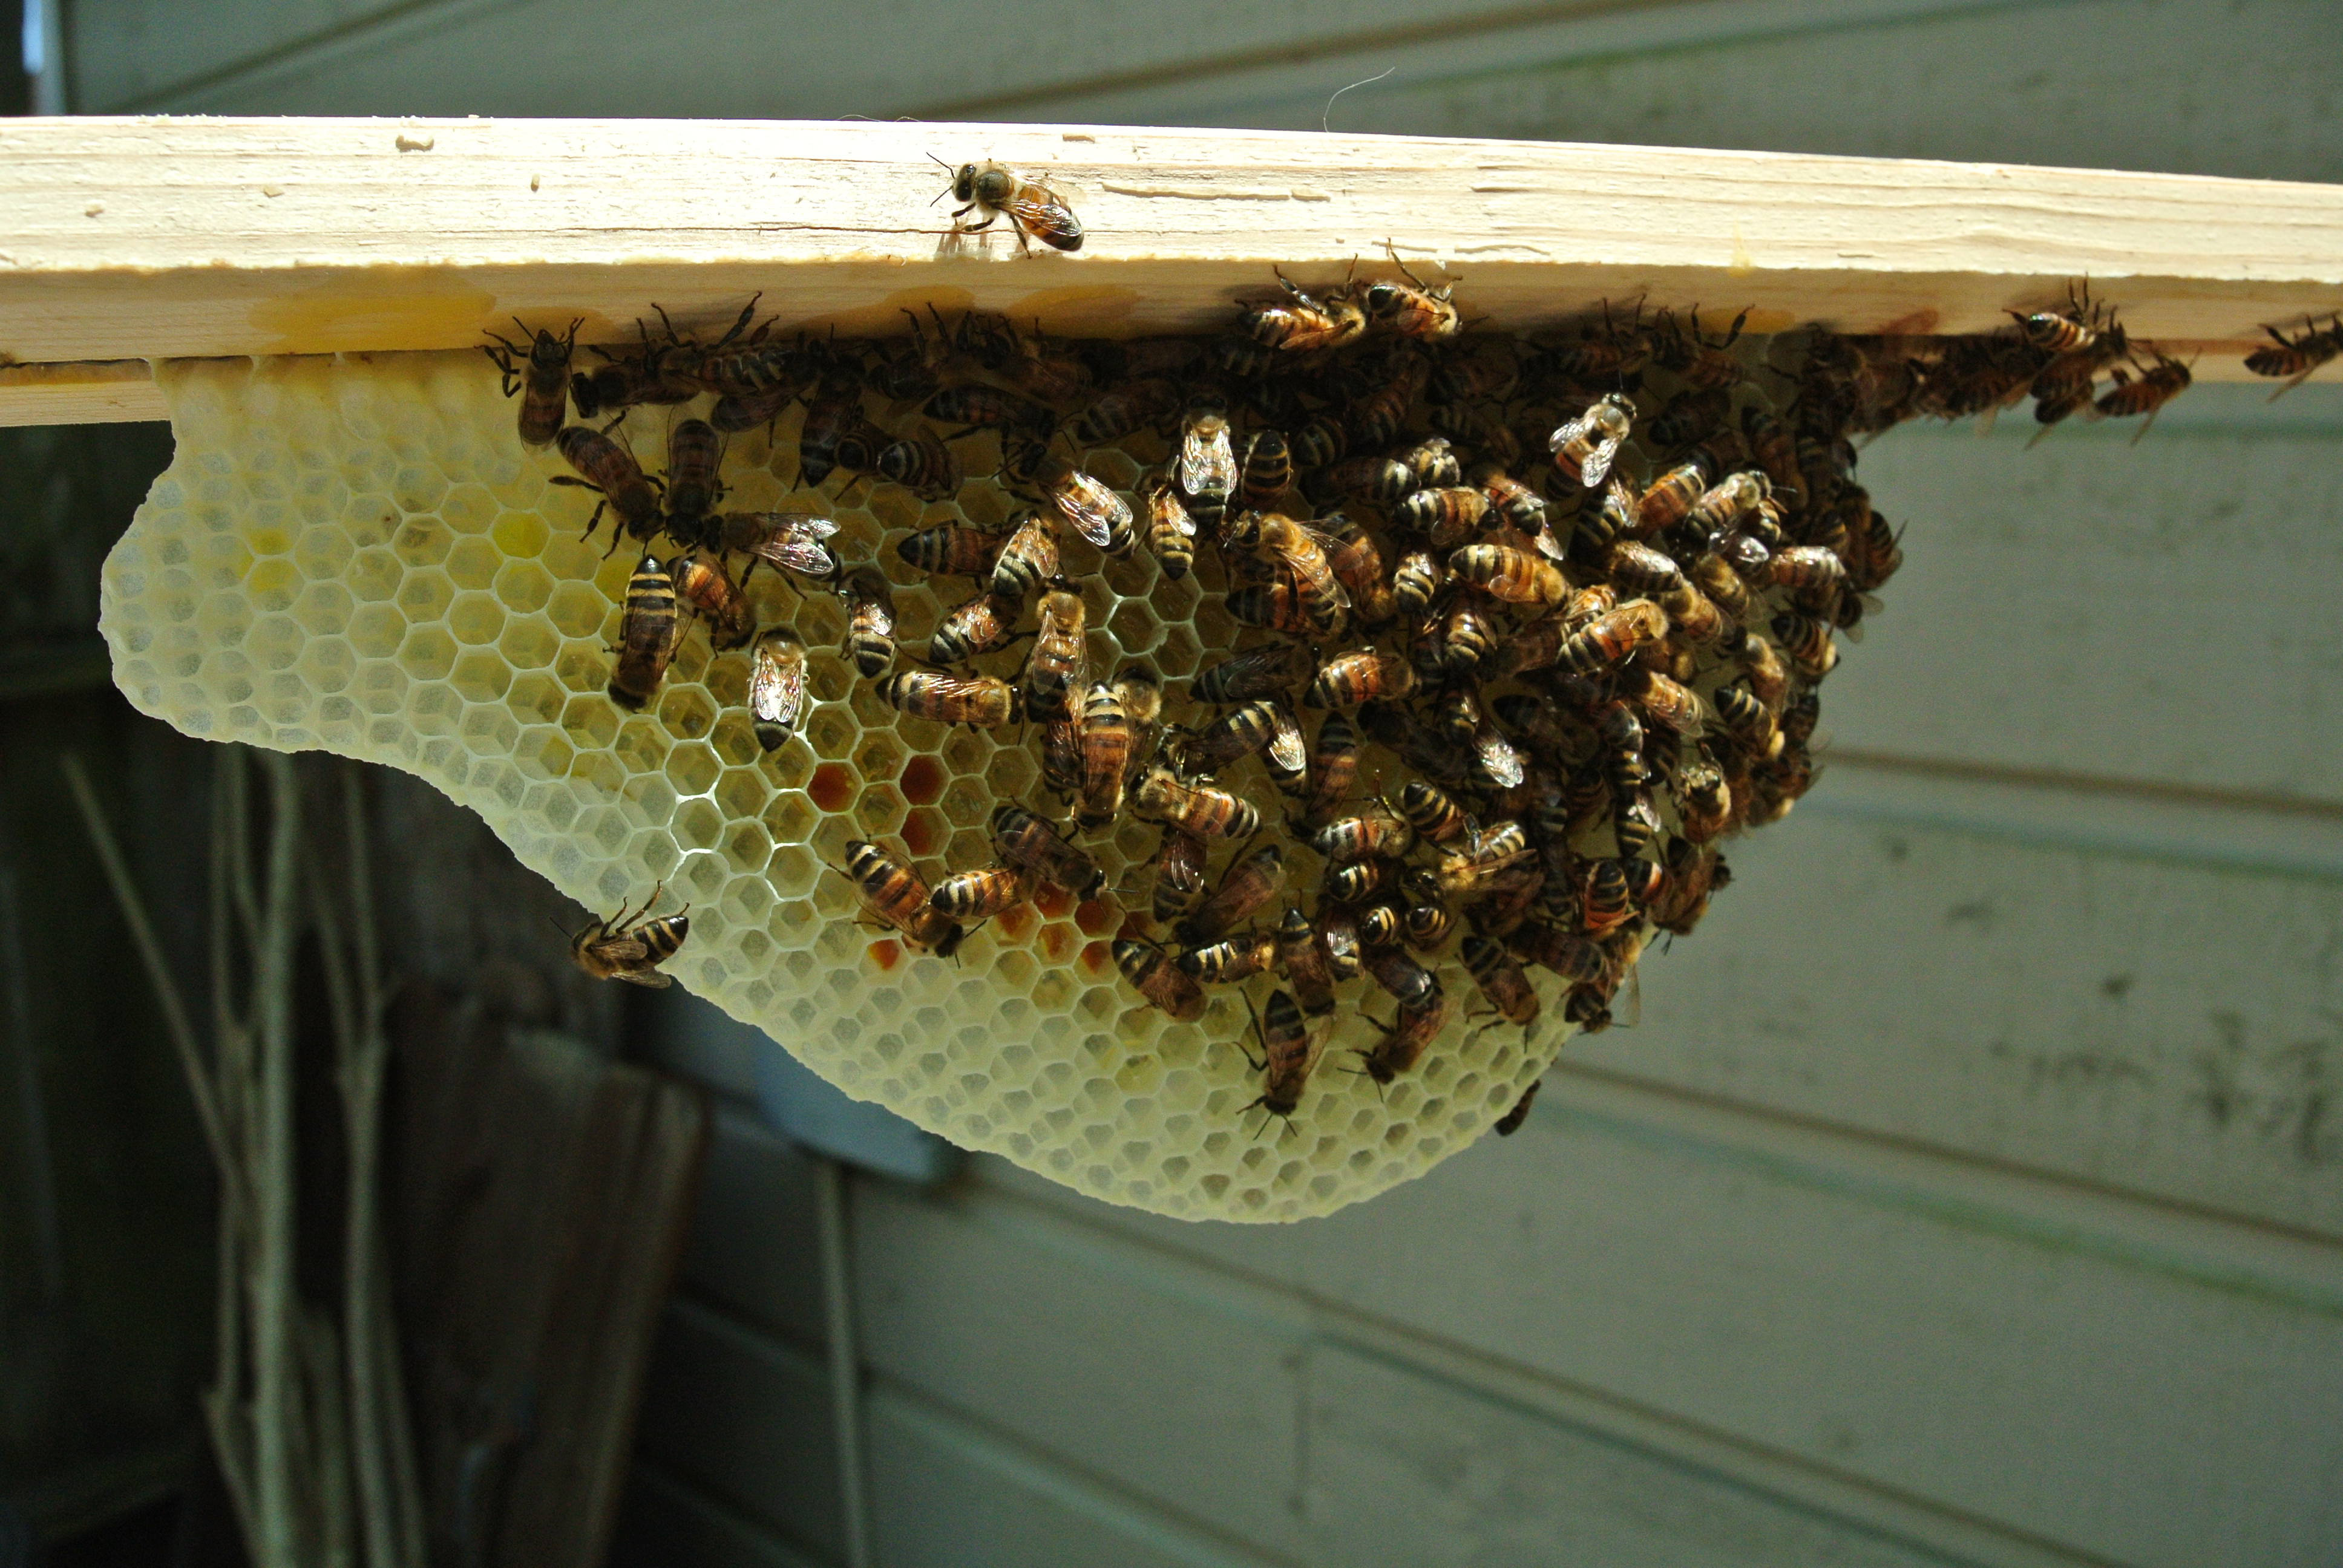
Now I need to make them comfortable. I have a short topbar box needing bees and it has 4 bars of drawn comb, some old heavily propolized bars and a packet of queen scent. Today was day three and the escapees have found a home. I just hope that the weather holds long enough to starve out the queen. Workers are bringing pollen in and I will add a feeder shortly.

Love watching the girls work and drawing in more recruits. If the weather was warmer I would be tempted to bring this box a bar of eggs and brood. I really need to get the queen to recognize that no resources are coming in and choose to leave. I will give her a little time and may poke another hole to pump some smoke into the cavity to encourage her to leave.

Update….. 8 days later and the bees have found some rotted out wood at the base of the old cold box back around the backside. I have sealed up the area but will have to wait for flying weather after our cold snap to gauge my success. Looking for something north of 50-55 degrees F to check it out.

TTFN

Bishop

Managing the Bananas

1 Comment

I learn by mistakes, usually after the second or third one! A year and a half ago my banana plant produced a stalk of bananas and I had no clue why. 

I also learn via research. The internet said, if I take care of the plants they may produce by design rather than by accident. It is 10-15 month cycle for the plant to bear, they won’t produce well if crowded and they like to be fed.  I am using fish emulsion and regular doses of my compost. 

The results for this season, have been two full stalks of the Burro banana and three of the Manzano. The dead or damaged leaves are now used for a layer of mulch/weed barrier. In some parts of Mexico the leaves are used to wrap tamales rather than using corn husks. 

Just change the topic and slide into more about bananas….,,

I recieved a call about some “free” bees in a TALL pine tree and my Goo friend John and I checked them out. They are 30 plus feet up in a the tree with multiple openings in a long split in the trunk. It will be a real challenge. Not sure I am the man for the job. 

 While looking over the yard I noticed a banana plant, a Burro banana plant, with a very nice stalk of nature bananas. Located behind that plant is what looks like a Manzano plant with a stalk developing. Wow!

So, I gave a lesson and cut a nice big hand of bananas for the home owners. I will definitely have to follow up. Here is a photo of a recently cut hand from my plant that is identical to the one I cut at the homeowner’s house.

From the photo you can definitely see where the term “chunky banana” comes from. 

Earlier in the day we went by one of my hives in the backyard of a friend. This is an 8 frame garden hive, two deeps and two medium supers, started from a package during the second week of April. This colony just exploded. Must be a great Queen and on top of that, a great location. The plan for the visit was the remove excess  frames, consolidate and ready the hive for the remainder of the summer. Well, the hive was over flowing and chock full. The result was 40 pounds of honey and we still left them with plenty. Added some hive beetle traps and closed them up. 


One of my garden hives pictured above from earlier in the spring. Just two deep boxes and no supers. Top bar hive in the background. 

Now, a day later, FYI, this is taking me three days to jot down, I need to visit my top bar hives and another set of garden hives before I run off on my Californua adventure. I was just reminded that I need to organize and clean up my hive work site – yes dear

TTFN

Bishop

From my Yard to Yours

3 Comments

Unpacked the 16 box shipment today  that arrived at the front door on Monday…..while I was traveling. In hindsight, I should have given my bride a heads up but…… Lumps look good on my head! UPS was very helpful.

16 boxes of what you are probably wondering! Even if you aren’t, I am going to tell you!!!!! Once opened they represent four,  8-frame garden hives. I will be adding two supers to each once the nectar flow starts.

I am building a couple more top bar hives and several more Langstroth hives over the winter. I will see how I handle that level of activity before stepping out and adding any more for the 2017 season.


Assembled and ready to finish. I am considering a natural finish but also like the idea of some soft pastel colors that blend with the backyard. I have one and possibly two more spoken for and looking for a home for the fourth. Wish my neighbor was not such a Grinch!


One of my top bar hives I set up to receive bees from a downed tree. The rescue was successful! The cone shaped wire screen outlet was pointed toward the hive opening off the open end of the log. Last inspection showed capped brood and eggs being layed. This one and my other top bar were built with “junk” wood lying about my yard. Will build two more full size top bar hives and two half hives for swarm capture or rescue operations.


A 16 inch wide slab of honeycomb from my top bar hive. So yummy!

TTFN

Bishop

Last Harvest from My Top Bar Hive

5 Comments

Sad story….Possibly, immediately after this last harvest the whole hive left….sometimes the old queen leaves and the hive has produced a new queen –  but I wasn’t so lucky. When I got back into it a few days later the robber bees were having  a field day. I salvaged some more honey but haven’t squeezed it yet….more on squeezing later.

A nice capped section of honeycomb ready to be cut off the bar.

A nice capped section of honeycomb ready to be cut off the bar.

My XXL gloved hand should give some perspective. I am still looking for XXXL gloves……fat hand, fat fingers and many, many auto-correct errors on my iPhone….that is a subject for another blog.

I am always amazed at how the bees draw comb....almost artistic in form and construction.

I am always amazed at how the bees draw comb….almost artistic in form and construction.

The comb above was not finished so it was shuffled around with the ones that I cut and replaced.

A nice pan full of lovely honey comb. It was a heavy haul.

A nice pan full of lovely honey comb. It was a heavy haul.

The squeezing process over a wire rack to catch the big chunks of wax as it drip through into a roasting pan.

The squeezing process over a wire rack to catch the big chunks of wax as it drips through into a roasting pan.

Pouring off  the honey and wax bits into the pail. There is a fine sieve screen that sits on the top of the pail to catch the small stuff.

Pouring off the honey and wax bits into the pail. There is a fine sieve screen that sits on the top of the pail to catch the small stuff.

Temptation....I was behaving but my wife and photographer snatched a few chunks of the delectable honeycomb for her snack.  One of our customers refers to the cut honeycomb as addictive.....It really is better than candy!

Temptation….I was behaving but my wife and photographer snatched a few chunks of the delectable honeycomb for her snack. One of our customers refers to the cut honeycomb as addictive…..It really is better than candy!

A hitchhiker from the hive area into the kitchen....This was one of 5 or 6 that we gathered up and escorted out to the backyard.

A hitchhiker from the hive area into the kitchen….This was one of 5 or 6 that we gathered up and escorted out to the backyard.

The second load from the roasting pan off  into the pail for straining. The wax is very evident on this shot.

The second load from the roasting pan off into the pail for straining. The wax is very evident on this shot.

Here is a shot of me squeezing the honey from the wax. I would squeeze and  compact the was as tight as I could. I then place it out near the hive and  the next several days it is wild watching the bees from the neighborhood clean the wax.

Here is a shot of me squeezing the honey from the wax. I would squeeze and compact the was as tight as I could. I then place it out near the hive and the next several days it is wild watching the bees from the neighborhood cleaning the wax.

12  pint jars - 18 pounds of honey and a little over 3 pounds in the white bucket. So danged good.

12 pint jars – 18 pounds of honey and a little over 3 pounds in the white bucket. So danged good.

I think my other empty top bar hive may become  a home for some swarming bees….I put some lemon grass oil in the hive and lots of bees are coming and going. it would be too funny if I recapture my bees!

TTFN

Bishop

First Harvest From The Top Bar Hive

3 Comments

Yum, Yum, Yum……I pulled 3 bars with huge slabs of beautiful fully capped honeycomb 20 minutes ago and I was totally amazed. I cut up and saved 20 3X3 inch chunks,  had a few to snack on and have a freezer bag full of odd sized pieces. Yum!

Getting ready to cut them lose.

Getting ready to cut them lose.

My son Joe suited up and gave me a hand. Thanks Joe.

My son Joe suited up and gave me a hand. Thanks Joe.

This will give you an idea how big the slabs of comb are. This one had an ear on the left hand side broke off.

This will give you an idea how big the slabs of comb are. This one had an ear on the left hand side broke off

The combs pulled on the top  bar hive are much thicker than those in my Langstroth hive. The broken pieces are so good to snack on!

The combs pulled on the top bar hive are much thicker than those in my Langstroth hive. The broken pieces are so good to snack on!

I separtted the slabs with parchment paper....they caught the dripping pretty well but I was sure tempted to lick them clean....I resisted!

I separated the slabs with parchment paper….they caught the drippings pretty well but I was sure tempted to lick them clean….I resisted!

I caught a shot of one of my bug catchers hanging out on a banana leaf with my iPhone the day before....They are so good looking.

I caught a shot of one of my bug catchers hanging out on a banana leaf with my iPhone the day before….They are so good looking.

More Top Bar adventures soon!

TTFN

Bishop

Blogging Again

1 Comment

A brief one to get the ball rolling…

The garden is still producing but not like in years past. The saving grace have been the cucumbers….Can’t give them away fast enough! The tomatoes are just pitiful looking specimens…..Oh, I pick a stray cherry tomato now and then but that is about it. The other success story is one of the banana varieties. I cut the stalk just below the female flowers after the plant switched to producing only male flowers. Those female flowers are developing nicely….time will tell.

I have a bee problem now…..a neighbor that has not been easy to get along with discovered my bee hive during a recent fence repair and filed a complaint. Almost 18 months with no issue but…….The HOA does not forbid bees but apparently there is a provision that if a resident “needs” protection from harm, i.e., bees, then I am the bad guy. They bees need a new home, far away from my yard.

The neighbor directly behind me is fully supportive of my bee keeping efforts. My neighbor to the east is a friend and fully supportive. The wicked witch to the West is the problem. Well, no honey for her! I have harvested about 8 gallons (about 90 pounds) from one hive and should have another good harvest just before fall.

My top bar hive is getting full. Tomorrow I am drafting my wife to give me a hand pulling some honeycomb and honey for my first harvest from this hive. It is a very healthy and strong hive. I am anxious to have it open tomorrow and show my wife how they build the comb and organize the activities inside the hive.

Nearly full width comb and deep into the box. We should see many, many more tomorrow.

Nearly full width comb and deep into the box. We should see many, many more tomorrow.

In two days I will move two of my hives to a farm, a little further than I wanted, but, I have a very interested woman that has been wanting bees. So off they go, both the large Langstroth hive and my top bar hive. I  retain ownership but, will have to travel to manage the hives. The second top bar hive was not to the bees liking when I installed them in May. They swarmed and moved off. Over the last few days there has been a small football sized mass of bees under some boards in the corner of my garden….they are now in my second top bar hive……I will see if I can keep it from scrutiny until it grows to the point that I can move it.

Took the cappings’ from today’s extraction of 6 medium frames. About two gallons of honey, 22 pounds was the result. I am using my solar “melter” to separate the wax and residual honey….nice, simple and easy way to do it. The solar box has a glass lid that helps hold the heat!

I mash the wax up on the top side of the SS pan. Still a bit of honey oozing out. Tomorrow the wax will be sitting on top of the water.

I mash the wax up on the top side of the SS pan. Still a bit of honey oozing out. Tomorrow the wax will be sitting on top of the water.

The melting process under the sun's heat melts the wax, drops out the trash as it drifts down to the water as relatively clean wax. I will later melt and filter it again through cheese cloth.

The melting process under the sun’s heat melts the wax, drops out the trash as it drifts down to the water as relatively clean wax. I will later melt and filter it again through cheese cloth.

Busy day today….I also transferred my Session India Pale Ale into the secondary fermenter. I added an ounce of Amarillo and an ounce of Simcoe hops……”dry hopping”. Should be amazing once finished. In a few days I will drop the temperature down to 34 degrees to get all the goodies to settle and bottle it. Can’t wait, but I will. Next up a beer using my honey as a component.

TTFN

Bishop

Top Bar Bee Hive

1 Comment

I recently built two top bar hives to go along with my large Langstroth hive in my backyard.

On May 15th I drove  over to Navasota, TX, and picked up two packages of bees with health young queens . I installed them that same day and left them pretty much alone for 9 days or so. I inspected to ensure that they were building straight comb and in the orientation that I wanted. “Yessiree they were doing good.

Today, June 1st and I opened them up again to see how they were progressing. I am again impressed. They have built out to the 5th bar on both hives and appear to be happy. Below is a picture of bar 5 in my hand.

They are building comb on the wax base strip I added.

They are building comb on the wax base strip I added.

On most of  the top bars a routed a 3/8 inch wide slot about 16″ wide, centered in the 19″wide  top bar. On 6 bars for each hive I switched to a 1/4″ router bit and did the same. In the 1/4″  groove I used some beeswax cell material cut into a narrow strip and used hot beeswax to hold it in place. It appears that they are using it as a reference. I spaced out the bars with the base material alternating the standard bars with the 3/8″ grooved. On the3/8″ grooved bars I have a 3/8 X 3/4 spline glued into the groove and painted with melted beeswax. It appears to be working.

Top bar number 4 is really looking good! Sorry about the washed out photo….flash was a bit too bright.

Nearly full width and deep into the box.

Nearly full width and deep into the box. Sun was a little bright and the flash washed it out a little.

The second TBH was almost identically drawn out so I didn’t photograph any of the comb. The next photo shows the top of the hive with the corrugated plastic roof removed.

The bars fit flush across the top made of standard 1X2 lumber so replacement parts won't be a problem.

The bars fit flush across the top made of standard 1X2 lumber so replacement parts won’t be a problem.

The bees were gentle  and quiet. I did use my hood and a little smoke but no gloves. Soon…I will share a story of my stupidity and a veil filled with angry bees. Wonderful lesson learned.

Tomorrow is my planned day to open the Langstroth hive and extract honey. The two top medium supers are packed full and I should have a bountiful harvest.

Base entrance to the hive...very busy and they seem to be enjoying a sunny day without rain! Me too!

Base entrance to the hive…very busy and they seem to be enjoying a sunny day without rain! Me too!

TTFN

Bishop

%d bloggers like this: