Home

Where Should I Start?

2 Comments

Let me jump in with some homemade cookies. I will backtrack just a bit to share my ,dilemmas…… FYI I looked it up because I wasn’t quite sure what the plural of dilemma was….. my guess was dilemmas but I worried that a certain English major friend of mine might subtly correct me…..I have beer blogging adventures that I am behind on, garden blogging that I am also behind on – my beekeeping adventures are included in the gardening blogs. Then there are those times when I meant to post a gardening blog and I don’t pay attention and it becomes a beer blog post and obviously vice versa. This post will be kitchen focused and feature my award winning Oatmeal Raisin Applesauce cookies with Chopped Walnuts. Credit goes to my Aunt actually but read on.

No brag just fact…..When I was 11 years old, 1962, I was encouraged to submit some baked goods into the youth division of the Kern County Fair. My sister, a year younger was on the hook to submit baked goods in more than 10 categories, primarily cookies. I committed to one cookie recipe and a coffee cake recipe. I will post the recipe that won first prize, ribbon and cash……..I am a professional of sorts. Just to set the record straight my coffee cake also won first prize, how, I will never know. My coffee cake was a rectangular sheet type cake, all of my competition were works of art in various shapes, glaze covered and adorned with all kinds of goodies (almost gaudy looking……) alas, that winning recipe has been lost in the fog of time and and many moves.

The winning fruit cookie was from a recipe given to us by my mother’s oldest sister, my Aunt Lula. If you look back in my blogging history I posted the recipe but received feedback from a cousin that I must have missed an important ingredient. After digging through scraps of paper and handwritten recipe cards I managed to find a pink 3X5 card in my mother’s hastily written handwriting and a college ruled 8 1/2 X 11 sheet in my hand writing…..there were gaps between the two that I tried to reconcile. My taste memory of Aunt Lula’s cookie was pretty well imbedded so I made a half batch to test the reconciliation. It turned out almost perfect. I made a small adjustment and the full batch recipe was an overwhelming success.

Aunt Lula’s Oatmeal Applesauce Raisin Cookies with Chopped Walnuts

  • 2 C applesauce
  • 1 stick butter (1/2 C)
  • 1 C brown sugar – I prefer the light brown
  • 1 C raisins
  • 1 tsp baking soda dissolved in ¼ C hot water
  • 2 ¼ C all-purpose flour
  • 1 C quick oatmeal
  • 1 C chopped walnuts
  • 1 tbsp. ground cinnamon
  • 1 tsp ground nutmeg
  • 1 tsp ground Allspice
  • I tsp ground cloves
  • Pinch of salt (1/16 tsp)
  • 1 Large egg

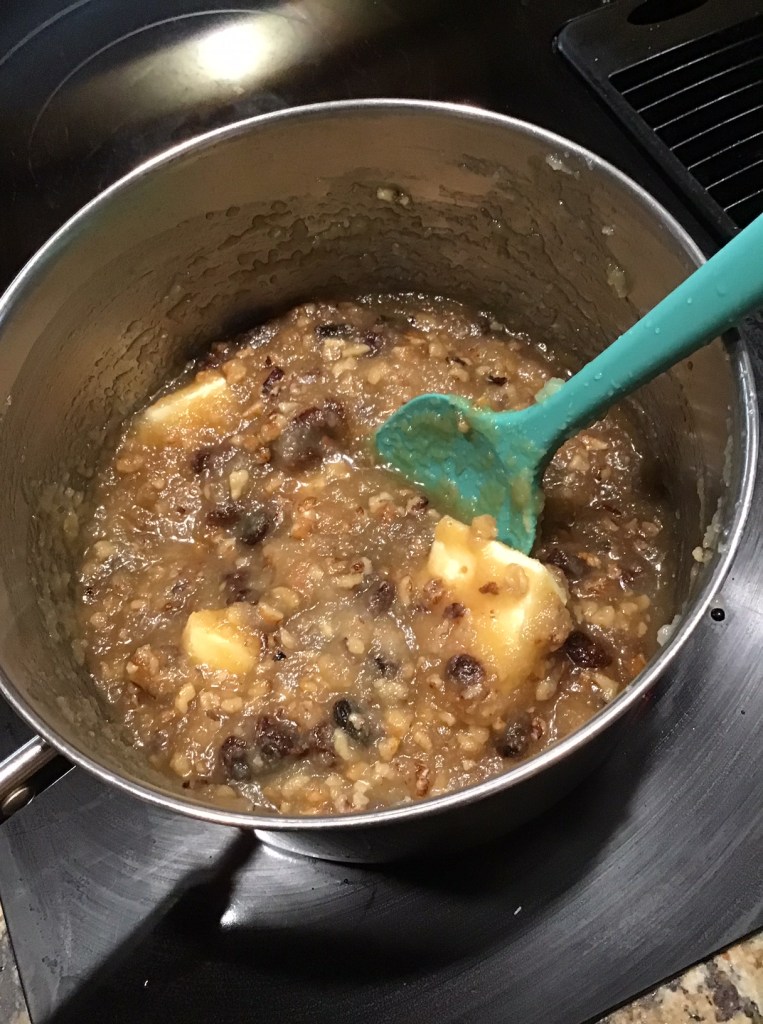
There is a method to my madness in making the line breaks in the ingredient list. My suggestion is to prepare the three steps in the process in advance. In a large sauce pan mix add the applesauce, brown sugar, butter and raisins. I use a microwave safe measuring cup with 1/4 C water and the Baking soda stirred into it but not yet heated. All the dry ingredients mixed well with egg sitting off to the side. It will be the last ingredient added!

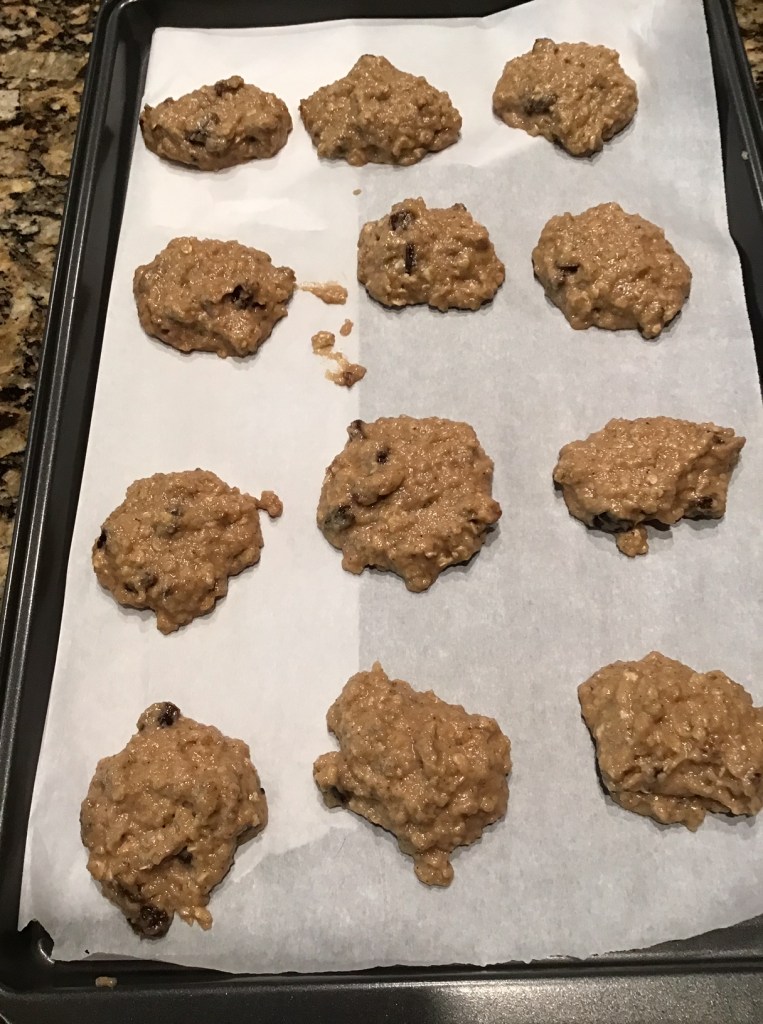
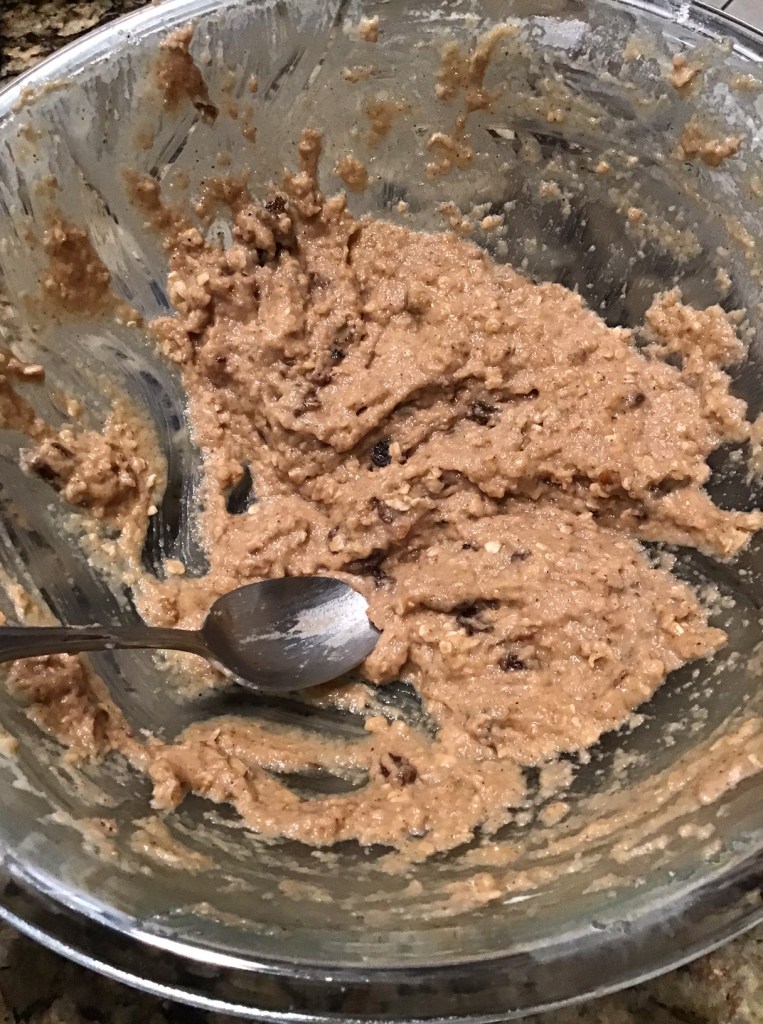
Start heating the saucepan mixture up to a boil while stirring often. As it approaches a good bubbling boil, heat the baking soda water mixture to almost boiling. Remove the saucepan from the heat then quickly pour the baking soda and water into the hot mix. It will foam up so continue to stir until it settles. Pour into the dry ingredients, it will become a sticky mess, then mix in the egg stirring/mixing thoroughly. Don’t forget the egg……don’t forget the egg.….there I said it twice …… well, you can guess why.

Saucepan ingredients ready to be heated up.The butter could be softened or as in the photo cut into smaller pieces in order to speed the process up.
Hot baking soda mix has been added and settling down.
Nice sticky gooey lumps of cookie dough. Surprisingly these cookies do not spread much at all. If aesthetics are important a cookie scoop would tidy the look up. The are baked at 350 Degrees F for 15 minutes or a little more – remove and cool on a wire rack.
24 cookies, 12 to a sheet were made with this batch and the remaining cookie dough is good eaten by spoonful or shaped into cookies…. The cookies actually taste better and become more moist the next day……soft, cake like and chewy.

The search it still on for the coffee cake recipe. My cookies won first prize two years running….

I really do need to give a lot of credit to my mom for giving me the love for cooking and baking.

TTFN

Bishop

Blueberry Syrup…. Yummy

1 Comment

My wife was needing to make some room in the freezer and a bag of blueberries I picked last summer was blocking her efforts. Rather than toss them out I decided to make some blueberry syrup. I love it on pancakes and Blue Bell vanilla ice cream. After defrosting I found that, magically, I had the perfect amount for my recipe.

It took a little longer than I anticipated and I did deviate from the recipe as described below. The results are fine!!!

Step 2. Preparing the base syrup sugar water with the lemon zest. I used Meyer Lemons from my garden….maybe not perfect but I think it worked out well.
Hard to see but I had no luck after 25 minutes with getting the syrup up to 225 degrees F.
Added the prepared blueberry juice and went to plan B. Pulled out my Cajun burner and cranked it up…..hit 225 F very quickly.
Final result is a little over two cups of very sweet and very tasty Blueberry syrup. Sunday is ice cream day at the Decker house…..guess what I am having?

Blueberry Syrup

  • 1 1/2 pounds blueberries (5 cups)
  • 4 cups water
  • 2 cups sugar
  • Six 1-inch strips of lemon zest removed with a vegetable peeler
  • 3 tablespoons fresh lemon juice

Directions

  • Step 1 In a pot, combine the blueberries with 1 cup of the water. Crush the berries with a potato masher and bring to a simmer. Simmer over low heat for 15 minutes. Strain the juice into a heatproof measuring cup, pressing hard on the solids. Discard the solids.
  • Step 2 Rinse out the pot. Add the sugar, lemon zest and the remaining 3 cups of water and bring to a boil, stirring to dissolve the sugar. Boil the syrup over moderate heat until it registers 225° on a candy thermometer, about 20 minutes. Add the blueberry juice and lemon juice and boil over high heat for 1 minute. Let the syrup cool, then discard the lemon zest. Pour the syrup into just-cleaned bottles. Seal and refrigerate for up to 6 months.

https://www.foodandwine.com/recipes/perfect-blueberry-syrup

By Grace Parisi

August 2010

I modified step 2 and chose to add the extracted juice and brought both, the sugar water and juice, up to the final temperature. It seemed to work fine.

TTFN

Bishop

Honey Fermented Garlic Cloves

Leave a comment

I do enjoy fermenting, primarily beer, a bit of wine and mead. I had never heard about fermenting garlic cloves. In fact, it wasn’t even my idea! My wife suggested it and didn’t even ask for my expertise! FYI, I have no expertise in the category of fermenting anything that doesn’t include an ABV % attached to it.

So why? I asked my wife why she decided to embark on this adventure and her immediate response was to receive the benefits of the “Immune-Boosting Effects”. Upon digging a little deeper there are other benefits that should “Reduce Blood Pressure” & Improves Cholesterol Levels, both LDL and total cholesterol.

“Studies have shown that the fermentation process increases the amount of nutrients in garlic and makes them easier to absorb by the body. The highest protein content was available after 60 days of fermentation while the highest fat and carbohydrate content was found after 90 days of fermentation.” From “ WebMD, September 29, 2020”

How to go about it? First prepare the garlic cloves by peeling the skin off by lightly crushing them or buy a big jar of already peeled garlic cloves. She opted for the latter. Next, she took a 1/2 gallon jar of raw honey and filled 3 one pound bottles leaving about 3 pounds, or around 8 cups of honey behind. She then loaded up the jar with a whole lot of garlic…..not a very quantitative measure but accurate. As the garlic settled she added more until the jar was chock full, again, not quantitative but the photo below will illustrate the quantity.

Chock full!

The honey that was used is raw honey…….so what exactly does that mean? Raw honey is best described as honey as it exists in the hive. Raw honey has not been filtered nor heated, has all of the pollen, natural wild yeasts and beneficial enzymes intact. The wild yeasts are the star of the process. As the garlic cloves release water into the honey it becomes wet enough to allow fermentation. Ideally honey is harvested with less than 18% water in order to prevent the yeast activity. In this case we want the % water to rise and allow fermentation.

After the fourth or fifth day of adding cloves up to the chock full point and also flipping the jar over several times daily keeping the cloves covered…..the bubbles were appearing…..fermentation was under way. Now the flipping process includes burping the gasses off……smells very garlicky ….. go figure. Kathy has selected a date about 3 months out for the first taste test, March 12, 2021 when some old guy she knows turns 70……wow! The jar will be stored in a dark cool place once the fermentation slows down. The honey fermented garlic can be safely stored out beyond a year or more according to the researched recipes.

How to use? Just pop a clove to boost immunity response during cold or flu season, this is Kathy’s primary reason for the effort. Cooking, use as a marinade or as a glaze for meats and vegetables. I will attach a link to foraging and fermenting website. Check it out, suggestions include honey fermented cranberries as well as elderberries. I think I will do the cranberries next year prior to Thanksgiving! https://www.growforagecookferment.com/fermented-honey-garlic/

TTFN

Bishop

Armenian Cucumber

Leave a comment

“The Armenian cucumber has a bit of an identity crisis.

Botanically, it’s considered a melon, with seeds and a mushy center that resembles a cantaloupe and a raw aftertaste akin to watermelon rind. Gardening enthusiasts like to compare it to zucchini. But if it’s picked at the proper time, it has the crispiness and flavor profile of a garden fresh conventional cucumber, so that won out in the naming convention.” https://www.mysanantonio.com/food/recipes-cooking/article/Armenian-cucumbers-stand-out-for-size-and-11949986.php

This one is a midsized fruit, 14 inches long by 3 1/2 inches wide.
Ready to be seasoned after coating in olive oil.

I thought that I had allowed the fruit to zoom past right size for picking but apparently that is not true. Up to about 18 inches long they mimic an English cuke in flavor. The really big ones apparently become sweeter and more melon like in flavor. I suspect the larger and sweeter ones may caramelize while grilling adding even more flavors. I will have to report back with results in the near future.

Unfortunately I composted this one before educating myself!

Grilled Armenian cucumber…….I am happy to report that it turned out well. Next time I will season it a little spicier but one thing I really liked is that it retained it’s crunch after grilling. I like grilled zucchini but it zooms past retaining it’s crunch far too fast while grilling…..mush! “While the grill is heating up, slice the cucumber into 1½ to 2-inch chunks and lightly coat both sides with olive oil and sprinkle each side with Spice Rub to taste. Place the chunks on the side of the grill opposite of the coals, and cook for 15 minutes with the lid on the grill closed, flipping once midway through. Move the chunks over to the area directly above the coals. Sear for 2 minutes per side and transfer to a plate and enjoy.”

Turned out very well. It is a keeper and I will do some experimenting to find a spicier rub mix. All in all, we enjoyed the Armenian Cucumber. My “Goo Friend”, chef last night also grilled the zucchini nicely.

TTFN

Bishop

Goo Friend….. there is story there somewhere in my archives. https://bishopsbackyardfarm.com/2016/04/

Tomato, Tomato, Bruschetta

1 Comment

This has been a pretty good year for tomatoes in my garden even though facing the nemesis of the Houston heat and humidity. Most varieties tend to fade as the heat sets in.

Successes – Juliet, a smallish bunching type off indeterminate tomato. Like a small Roma shaped tomato, thick skinned, meaty and pretty sweet. Patio tomato– in a pot on the patio – duh, a determinate type. Very productive but slowing down with the heat. Brandywine, an indeterminate and tough to grow in the Houston heat as the blossoms don’t set well. I used buzz pollination, electric toothbrush vibrating the blossoms, and had my best harvest ever. Cherokee Purple, also an indeterminate type, what a great surprise! They have made the best BLT’s ever!

Failures – Celebrity, indeterminate type, usually great in Houston……fungus of some sort. Pulled it out after 10-15 maters but not before the fungus hit the adjacent Sweet Million cherry tomato. The failures may have more to do with my lazy practices…..the tomatoes were all in last year’s tomato bed….poor practice!

Bruschetta- my tomatoes, my basil and my homemade sourdough. I didn’t make baguettes but pleased with the results just the same. I used a mix of tomatoes to make about 3 cups of peeled, chopped and drained tomatoes. Added several thinly sliced garlic cloves along with ribbon sliced basil. Sea salt and some black pepper, extra virgin olive oil and balsamic vinegar to taste. Let it chill for a few hours.

The sourdough loaf was quartered and the pieces were manageable.

Next, my sourdough, thinly sliced and toasted on one side in the broiler. Then the toasted side was rubbed thoroughly with a large garlic clove cut in half. The roasted bread seems to grate off the yummy garlic. I used every bit of the garlic halves. The olive oil drizzle was left off until served and then added by the slice as it was consumed.

Love my sourdough bread. I am using a slow proofing schedule that really enhances the flavor.

TTFN

Bishop

Sourdough with Spent Brewing Grains.

9 Comments

I have been diligently making sourdough during our social distancing exercise and I am getting pretty good at it. Yes, I am patting myself on the back. I searched the web for a simple and straightforward sourdough recipe utilizing the spent grains………. I’m a simple guy and I got lucky – finding a simple recipe within my skill set! See below.

Sourdough & Spent Grain Bread – based on a recipe from this site….pretty much followed it but just a few tweaks. https://noteatingoutinny.com/2010/04/13/sourdough-spent-grain-rye-bread/

1 cup sourdough starter
3 1/2 cups all-purpose flour – I used 3 and it was just enough.
1 cup spent grain, still a bit wet
2 teaspoons salt
1 1/2 – 2 cups water – varies depending on how wet the spent grains are.

Combine the starter, 3 cups of the flour and enough water to allow the dough to just come together, in shaggy strands(I didn’t know what that meant so I googled for images). Knead about 5-6 minutes( I used dough hook) and let rest in a bowl, covered with a towel. Keep in a warm place and let sit for 1 hour. Fold in the mash with your hands and dust on the remaining flour as you combine it to help keep dough from being too sticky( I used my stand mixer and a dough hook). Form dough into a long, oblong loaf (or put it in a prepared loaf pan, I had a 5X9 loaf pan, sprayed a little Pam on the sides and coated the top of the dough with flour. I did a couple rounds of stretch and fold like do with my regular sourdough prior to the final rise. Let sit in a warm place covered with a towel for an 1 hour or so. Score deeply before placing the oven.

Preheat oven to 450 degrees. I used a big pizza stone that was also preheated. Bake for about 20 minutes, monitor, I used a thermometer to chick internal temperature. It took an additional 10 minutes to reach 200 F. Remove and let cool on a rack for 10 minutes before eating. My wife didn’t want to wait…… I held my ground and gave her the first warm slice with butter. She forgave me!

Drink Local and Drink Responsibly

Bishop


Meyer Lemon Jelly and Other Tidbits

3 Comments

As I promised in the last post, I am reporting back on the tasting feedback and impressions…..

Visually most folks thought it looked like light spring honey, see below.

One comment…..”tastes like key lime”…..I can second that!

” I like the jelly but was expecting a more pronounced lemon flavor”……FYI Meyer Lemons really aren’t a lemon.

And so on….”good, nice, tasty, can I take a jar?”

I am going to pronounce it a success and will do another batch this rainy weekend. I will likely jar up a bigger number of sample size jars for give aways. I will also resurrect the jam recipe, much like a marmalade. I will post that recipe if it comes to fruition.

Tidbits

Bees….16 hives and, knock on wood…..they all seem to be doing well. With the mild November and December the bees have been active. I have not seen pollen coming in for the last 3 or more weeks. I decided to put out feeders with pollen substitute. Based on the first one placed the bees are doing a happy dance. In less than 24 hours they had zeroed in and were loading up. See slomo video below.

I love watching the slomo images. The iPhone is pretty awesome.

The charity trap out appears to have been a success. All the bees are out of the shed where they had made a home and now reside in my half size top bar box. The big unknown is – how big is the colony? I started feeding sugar syrup two weeks ago and they sucked it all down. I added pollen substitute yesterday. During the cold snap on Monday I will lock them in and bring them home to fatten them up.

The garden is bare except for the Meyer Lemon tree and 70 new strawberry plants that are developing nicely. Plans for beets and sugar snap peas for planting in late February are underway. I need to refurbish the timbers on one of the 4 X 25 foot raised beds.

Another relatively tedious project will be to rebuild my tandem 4 X 4 X 4 compost bins.

I was gifted a bat house for Christmas figuring I could put it up high on my large oak tree…….guess what, not recommended. So, I need to come up with plan B! Maybe I can build an owl house and put it up in the oak tree.

TTFN

Bishop

Mmmmmmmm………..Meyer Lemons!

2 Comments

The Meyer Lemon is not really a lemon. Bottom line, Meyer Lemons are both sweeter and less acidic than a true lemon.

“Citrus × meyeri, the Meyer lemon, is a hybrid citrus fruit native to China. It is a cross between a citron and a mandarin/pomelo hybrid distinct from the common or bitter oranges.[1]

Mature trees are around 6 to 10 ft (2 to 3 m) tall with dark green shiny leaves. Flowers are white with a purple base and fragrant. The fruit is rounder than a true lemon, deep yellow with a slight orange tint when ripe, and has a sweeter, less acidic flavor.”

From Wikipedia.

My Meyer Lemon tree has finally become productive after the hard freeze of …. I think 2017! I thought it had killed my lime tree and it obviously heavily damaged the Meyer Lemon. I trimmed the Meyer Lemon back and ignored the lime tree. As spring arrived the Meyer Lemon was sprouting new growth but the lime was bare. As I ripped the lime out of the ground I saw new growth….. too late – the was likely below the graft. Task done!

Meyer Lemons make a lemon curd that is both heavenly and bursting at the seams with both flavor and calories. Today’s cooking adventure does not involve lemon curd – it involves a first for me…….lemon Jelly. This will be a variation of the Meyer Lemon Honey jam I have made in the past. I have to give credit for the inspiration to Max Moszkowicz….he makes “lime jelly” and I just thought….Why not Meyer Lemon Jelly!

The process creates a wonderful aroma throughout the house. The aromatic lemons were thickly sliced and left soaking overnight in the kitchen. Then the aroma really amps up as they boil for 2 hours!

You can almost smell the aromas emanating from the photo of the boiling pot!

I am posting the recipe which includes the jelly variation. A disclaimer……only the Meyer Lemons are organic in my version……I know that for a fact as I have 100% control over the lemon growing. The honey is also mine, not lemon blossom, but it is local and raw – I can’t guarantee that it is organic………I tell bees to stay away from non-organic sources but I am not sure they pay much attention to me.

Once the jelly is done and allowed to set for a few days I will post a taste test update.

Meyer Lemon Honey Jam

INGREDIENTS 

*3 lbs Lemons (Meyers, of course!) 

*6 cups filtered Water 

*5 cups Organic Cane Sugar 

*1/4 cup Organic Lemon Honey (or other delicately flavored honey like Orange or Clover) 

*6 drops pure Lemon Essential Oil (1 drop for each cup of juice) 


INSTRUCTIONS ~ WASH lemons. 

~ TRIM off ends. Cut into fat slices. REMOVE pits (if making Jelly) 

~ COVER with filtered water. Leave to soak overnight or 7-8hrs

~ BOIL for 2 hours covered. ~ Then STRAIN through a jelly bag. COMMENT: Don’t be tempted to squeeze the bag or your jelly won’t be clear! ———————- 

NOTE: If you want to make Lemon JAM, skip the straining & whir the hot lemons and water carefully with an immersion blender. You definitely wouldn’t want the pits in the mix for jam though! So pick them out.

~ MEASURE juice. ~ ADD 1 cup sugar per cup of juice. STIR to dissolve sugar over low heat. ~ BOIL again until set. (15-30 minutes) ~ FILL sterilized jars as usual. ~ STORE in a dark cool cupboard. Jelly will keep for 1-2 years, but the flavor & color tend to fade beyond that time. 

Recipe from – http://www.figswithbri.com/

One of the web sites suggested that a slice of lemon would enhance the beauty of the jelly in the jars. I thought it would look great too! I sliced up a lemon, filled the jars, placed the jars in the canning water bath, turned around and what did I discover? You guessed it.

They will pretty good on top of some grilled salmon filets! LOL.

Almost looks like a light spring honey as a finished product!

TTFN

Bishop

Additional trivia for those that are curious……

“The citron (Citrus medica) is a large fragrant citrus fruit with a thick rind. It is one of the original citrus fruits from which all other citrus types developed through natural hybrid speciation or artificial hybridization.”

“Mandarin – mandarin orange

Pomelo – “The pomelo is one of the original citrus species from which the rest of cultivated citrus have been hybridized. 

Yellow Banana Peppers Galore

2 Comments

I only put in a single yellow banana pepper plant – and the title fits nicely.

galore

At a party with more cupcakes than anyone could imagine, you’ll hear guests say, “There are cupcakes galore!”  Galore means there’s so much that it’s unbelievable.

The Irish phrase go lear literally translates as “to sufficiency.” If there are sufficient enough bananas to build a house with them, you’d say that there are bananas galore. The word is an example of a postpositive adjective, which means it comes after the word it describes. So when you go to a circus and 700 clowns surround you, don’t say “There are galore clowns,” because the correct way to express your terror is this: “There are clowns galore. Help”.

I increased my knowledge of the English language today. Without knowing why, I had always used the word “galore” as shown in the title. Unbeknownst to me – the word “galore” is a postpositive adjective. Reminds me of a common gringo mistake of placing the adjective before the nouns when attempting to speak Spanish. In English it is “blue sky” , in Spanish it is “sky blue – cielo azul”!

Ok, language lessons over for today. Now let’s deal with my yellow banana peppers galore!

I brought in another handful before I started slicing them up into 1/4 inch thick rings. I did weigh the pile, a little more than two pounds, more than 900 grams. My garden seems to be well suited for growing peppers and such. These are about 6″ or 15 cm long!

I stuffed the pepper rings into 4 pint jars and a single 1/2 pint jar, all jars preheated of course. The pickling mix was 5 cups cider vinegar, 1 1/4 cup water and 5 tsp pickling salt brought to a boil. Prior to stuffing the peppers into the jars I added 1 tbsp mustard seeds and 1/2 teaspoon of sesame seeds into the pint jars and about half that amount into the half pint jar.

The heated pickling mix was poured over the peppers leaving a little less than 1/2 inch of head space. They were processed 10 minutes in a boiling water bath.

Recommend letting them sit undisturbed for a day or more and then tuck them away for a week or two to allow the flavors to blend.

Ready to process.

The final product with some of my 5 gallon honey buckets in the background.

I also have Poblano peppers galore! I will fire the smoker up this weekend and roast/smoke them with pecan wood. These scrumptious smoked peppers provide the heat and smoky flavor for my smoked Poblano pepper jelly. Amazing as a glaze on pork chops or pork loin and also very nice mixed with soft cream cheese as a chip dip. Yum!

TTFN

Bishop

Wild Mustang Grape Jelly Revisited

8 Comments

I am sad to report that my “secret spot”for picking the Mustang Grapes was cut back by the City of Houston this spring so I was forced to find another source. I was able to forage a little over 3 gallons of grapes. It is a hot sweaty endeavor to gather up the grapes as they ripen at the beginning of July. It was 95 degrees F and 80+% humidity when I was picking. I was thoroughly soaked when finished.

Many times I can find nice clusters like this but most of the time I’m not so lucky. Photo from the attached article- I can’t take credit for it.

Preparation of the grapes takes some time. I spend the time to de-stem all of the grapes but have discovered that the time consuming effort may be a bit of overkill. I am attaching a link to a recipe that simplifies the process and leaves the stems on. Just a note, I do not wear gloves when I pick and then de-stem the grapes. My hands have experienced a mild but persistent itching sensation for a day plus after handling the grapes. I will use glove next time both while picking and then skip the de-stemming step.

My recipe calls for 5 cups of strained juice….. I don’t force it through the cheesecloth as I like clear jelly. The jelly is a very sweet yet tart jelly with 7 cups of sugar. I use Sure Jell pectin and a tablespoon of butter. I find that I need to boil it at a full rolling boil for almost 6 minutes before it reaches the jelling point I like. The boiling process foams up very high so a deep pot is a necessity. I find that once removed from the heat the foam falls quickly and leaves little if any foam to skim off before ladling into the jars. I process for 10 minutes in a boiling water bath.

The photos don’t quite do it justice. The color of this jelly is amazing! I made 6 sample/gift size jars with this batch. I will make a couple more batches for a total of 30+/- half pint jars. And yes, I will part with a half pint jar for $6.00 or an appropriate barter!

The attached article has a recipe that differs very little from mine but does include a 1/4 cup of lemon juice to aid in the setting of the jelly and a 1/4 cup less grape juice. A word of advice, unless you have large sized equipment, do single batches and always measure everything meticulously. Test your jelly to ensure it has boiled long enough. The attached article as a great explanation and photos illustrating how to check your jelly.

https://jennifercooks.com/how-to-make-wild-mustang-grape-jelly/

TTFN

Bishop

Older Entries

%d bloggers like this: